Thursday, July 18, 2013

How to avoid PDF virus and protect your PC

PDF (Portable Document Format) files are used to store information and are transferred via different means.
Generally we think PDF files are safe from viruses. Are they Really safe from Virus??
Answer is "NO"
PDF Virus

Shocked !!!

So, How do PDF files become malicious?
- Programmers inject a small piece of Javascript code in the PDF file.
- When you open the PDF document, the script will be executed and it will call an external virus(mostly trojan) and it will infect your computer.

Now, you will ask too many questions :
How to avoid PDF virus and protect my PC ?
How to use PDF files without infecting my PC ?
What is the Solution to PDF virus ?

- Don't worry, follow these instructions and protect your PC :

Solution


Adobe Reader Users:

Open Adobe Reader
->Edit -> Preferences (or press ctrl + k)
In Categories ->Javascript.

Adobe reader preference

-> Uncheck Enable Acrobat JavaScript 
-> Ok

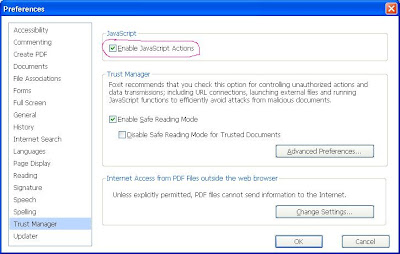
Foxit Reader users:

Open Foxit Reader
->File->Preferences

poxit reader preferences

-> Trust Manager -> in Javascript -> Uncheck Enable JavaScript Actions
-> OK

Now Open PDF files without worry !!
:) :)


Wednesday, July 3, 2013

Free internet - Free Zone by Google

If I ask - Do You wish to minimise your Mobile internet bill??
the Answer will be - Yes, definitely!! who wishes to pay high 3G data pricing!!

Here is Solution to high 3G data charge

 Free Zone Powered by Google

As per Google : Use the best of Google on the go, data charge free.

What is Free Zone?

- Using Free Zone you can access many internet services free of cost(no charge for data). 

- These free services mostly include Google+, Gmail and Google Search.

- Available on most internet-enabled mobile phones on default Browser(no 3rd party browser)

- You can use Free Zone even if you haven’t subscribed to a data plan with your operator.

- Before you are charged, you will see a notification page. If you don’t already have a data plan, you will be given the opportunity to sign up for one.

- Whenever it is Green, you can surf free of cost, when it turns Red billing will start ie, your data plan comes in picture there.

- Viewing mail attachment is charged.

- No charge for Google search, even you can go to the website shown on the search page without being charged. But if you clicked on any link there, then pricing will come in picture.

example : if you click on a search link to a Wikipedia article, you won’t pay anything. But if you click on a link within the article, you will be charged for the data costs incurred loading that link. Also, you will be warned before being charged.
 
Basically, you can save money for using these services via Free Zone. Rest of the internet is charged as usual.

** only Mobile users will get this facility with default browsers. PC or Tab users will be charged as normal

Happy Surfing!!
:) :)

Source:
http://www.google.com/intl/en_in/mobile/landing/freezone/

Thursday, June 27, 2013

Facebook Unresponsive Script Error Solved - https://fbstatic-a.akamaihd.net/

Hello Friends, 
FB Error Solved

Today I am sharing Solution of the problem I was facing from many days and after searching about it I came to know that I am not the only one!! (gives pleasure when you are not the only sufferer :D :D  )

Problem :

Using Facebook with some tabs open for more than 15- 20 minutes, a Script error comes with Heading 'warning: unresponsive Script' :
(Later part of the script differs when it is generated again or different in system)
https://fbstatic-a.akamaihd.net/rsrc.php/v2/yw/r/80Iw8OZOF5Q.js:57
Script error
 and browsers hangs up.

Browser Affected: all (I am using Mozzilla Firefox, but after googling the problem suggested this problem is with all browsers)

Cause : 
might be issue due to Image Fetching from "akamaihd.net"

In Simple words, The images uploaded to Facebook(not hosted on Facebook Server), are actually being hosted by akamaihd.net, a CDN (content delivery network) you can say, a third party provider.

How can I say that images are not hosted on Facebook but on akamaihd.net ??
- Well, go to any image you have uploaded in your time line -> right click on image -> view image(Firefox) or open image in new tab(in chrome)
check the address bar now, it will look like:

 https://fbcdn-sphotos-e-a.akamaihd.net/hphotos-ak-ash4/q71/1044574_651080944920330_1908721470_n.jpg


Look at the highlighted section.(sorry, if the image made your mouth flooded )


Solution

 Restoring the browser to factory settings or creating a new Profile for browser may solve this but only for sometime.
Till now, I came to only one perfect solution that too for Mozilla Firefox only. 
it is an addon of firefox 'FB Phishing Protector' , version 4.3 onwards solves this problem
check it Here
if you wish to check its other versions, Go Here
Just add it... Done!!

Happy Facebooking!!
:) :)


Source :

http://www.codefap.com/2013/01/what-is-akamaihd-net-in-a-facebook-link/ 

http://forums.mozillazine.org/viewtopic.php?f=38&t=2624819


Wednesday, June 12, 2013

Best antivirus for windows 8 - Enable Windows Defender


Hello Friends, Today we will discuss about Windows 8. We have heard about it that it is very much Secure, Yes it is!!
Some bugs were there, Don't worry, soon you will see 'Windows Blue' in form of Update 'Windows 8.1' which is good. As per Microsoft : We know you’re not super happy and we’re going to make it better.

Lets talk about Antivirus for Windows 8, I have come across the most popular question:

Which is best Antivirus for Windows 8?


Answer?
:) well.. most of you don't know, Windows 8 comes with inbuilt complete and Full Protection Antivirus in form of Windows Defender.


Microsoft has clubbed Microsoft Security Essentials in Windows Defender.
Use it, it is good.
Now Question arises..

How to Enable Windows Defender in Windows 8 ?
- First, Uninstall any Previously installed Antivirus.
- bring up charms menu on right hand side of screen,
- click settings -> control panel -> Action Center
- in Action Center -> under 'Security' -> press "Turn on now" button to enable "Windows Defender".

In Search, Type 'Services' ->


 window defender, click settings tab, click turn on real time protection. save
Done!!!


No need to purchase any antivirus software. You are safe now.

Enjoy!! 


Saturday, May 4, 2013

Secure Facebook account using Trusted Contacts

Secure Facebook
Hello Friends, All of you must be using Facebook, so do I. 
Recently, Facebook announced a new feature called "Trusted Contacts" to help you get back into your account when locked out.
Now you will ask:

Q. What are Trusted Contacts?
- Trusted contacts are people(your friends) you can reach out to if you ever need help getting into your Facebook account (ex: if you forget your Facebook password and can’t get into your email account to reset it).

So, Why did I named this article as 'Secure Facebook Account using Trusted Contacts' ?
- Yes, I named it right. As it is developed to prevent intruders from accessing your Facebook account easily using Facebook's loophole.


 Surprised!! Read On..

Facebook released this feature to Strengthen one of its feature which was more used by intruders to access Facebook accounts for wrong means rather than the actual purpose.

Warning: this article is meant to encourage security by showing loophole and its solution. Don't use it for wrong means, Author doesn't take responsibility if anyone uses 'part of this article' for wrong means.
 
Let's see what intruders do to access someone's Facebook account who is not using "Trusted Contacts" 


- in Facebook login page, click 'Forgot your password'
- next page, Identify your account, give Victim's full name or account information
- Next page, asks to reset password using email or phone, click 'No longer have access to these'
- it will ask a new email to reach you, give one
- now it asks 'Answer Your Security Question' - click - Recover your account with help from friends
- next page shows steps to recover your account- click continue
- Victim's Friends-list comes now, here intruder use two methods:
    a) they choose their own Fake FB accounts with which he/she has become friend with victim already
    b) they choose any 2 victim's friend with whom he can access codes 
(obviously, 3rd friend is intruder himself)
- provides code and access the victim's account


Solution


What can we do?
- Simple, As the heading suggests, use "Trusted Contacts"


How?


- Go to 'Security Settings' -> Trusted Contacts ->Choose Trusted Contacts


Security Settings

- click 'Choose Trusted Contacts'


- Type name of your 3 or 5 'Trusted Friends' -> select -> confirm


- Re-Enter your password ->Submit

- Done

Now, if intruder tries to access your account using this loophole, he gets this page:


Even if he/she  clicks 'Reveal My Trusted Contacts', it will show :


And it will reveal their names only when intruder knows 'Full name' of any one of your chosen friend.
Even if he/she guesses it right(less probable) he have to get codes from person you have chosen(very difficult) rather than those whom he wishes to choose!!

Remember, your account will be more secure if along-with you & your friends have secure accounts. So, spread this knowledge.

Happy Facebooking !!
:) :)


Tuesday, April 16, 2013

Spooler Subsystem Application has Stopped Working - Solved

Problem: 

Printer, which was working fine previously, all of a sudden Shows an Error "Spooler Subsystem Application has Stopped Working" after giving print command.

My Friend had suffered this problem and had informed me about it. Yesterday it was printing perfectly fine today showing this error!

After checking the system, I came to conclusion that it was the Service 'Print Spooler' (process- spoolsv.exe) which repeatedly kept crashing all the time.

A print spooler is software that temporarily stores print jobs on the computer hard disk or in memory until the printer is ready to print them.

So, what is the reason behind this sudden change?
'Unknown' is the one word answer to it. 
But after reading comments in Microsoft forum by Lots and lots of people(who faced this issue) , some points came in majority:
- Mostly, Vista users were facing this problem. Compatibility issue between 'printer driver' and 'some update for vista' may be the Major cause.
- Default port for Printing found changed
- Some issue with 'Adobe Acrobat drivers' also came in picture(reinstall all acrobat software like adobe reader, flash player etc if your Acrobat is also showing problem)
- Sometimes Print Spooler behaves starnge when more documents get stuck in the print queue.


Solution

Method I

Make sure Default port set in Printer Properties is same as the Port used by you to connect Printer with computer. Updates sometime reset it.

Mostly Printer is connected using:
1) LPT Port
LPT Port - Male

LPT Port - Female

2) USB Port


You must check Printer Properties now.

Go to:
-Start -> Control panel -> Device and Printer ('Printer and Faxes' in some versions)
-Look for your Printer,
-Right click Printer icon-> Properties
-Look for 'Port' in tabs there, check whether the port selected and Port used by Printer to connect your PC is same or not. 

-If not, then Select the appropriate one.

If this doesn't solve the issue, try next Method.


Method II

Since, Major cause of this problem seems 'update' So it is better to do System Restore(if it was kept ON)

Restore your Computer to any date which is earlier to the date when Printer was working fine.
If you had taken print on 10th of April then restore it to any date before 9th April.

Go to:
- Start -> Accessories -> System Tools -> System Restore
- Restore to earlier date
- Choose the Date as discussed above
- Restore

This must solve problem for most of you as it did in my Friend's case.

If it doesn't, Don't worry!!

Next method is one which Most people found helpful.

Wonder why I still kept it Third?
- As many of them didn't try above simpler Methods.


Method III

If you came to this Method then you must carry your Printer Driver CD with you. If you lost it, then Download it from internet using your proper Printer Model in Search engine.

Let us Start now:

Go to:
- Start -> Control panel -> Programs and Features ->  click 'Turn Windows features on or off'


Turn Windows Feature ON or OFF


Windows Features
-Click + sign of Print services

-Select LPD and LPR-> OK
(let it complete)


-Now again go to the same and Remove ‘Internet Printing Client
-> OK


-Restart your PC to ensure there is no error of spooler service.


-Reinstall your printer driver.


I am sure, Very few of you still have the error!!

For those who do, follow Next Method.


Method IV

Precaution: As now we will change registry entries, it is strongly recommended to back up your system, create System Restore checkpoint and export registry before each step.


How to export registry?
- check this page:  'Export Registry'

Let us Start now:


1) Reboot the machine into SAFE mode.
 

2) Go and Delete All the files from:
C:\Windows\System32\spool\drivers\x64\
C:\Windows\System32\spool\drivers\W32X86\

C:\Windows\System32\spool\PRINTERS 
(If you wish, you can cut and paste to different location)
 

Next few steps involve the Registry So make sure to Back up the Registry

3) Open Regedit 


 a) Go to

Computer\HKEY_LOCAL_MACHINE\SYSTEM\CurrentControlSet\Control\Print\Environments\Windows NT x86
 

Inside the subkey list, there should only be the following subkeys:
>Drivers
>Print Processors
 

If there are any subkeys other than the subkeys that are listed above, 
- Export registry, name it 'WindowsNTx86'
- Delete all the subkeys other than listed above.
To do this, right-click each subkey to be deleted, click 'Delete'.
Click 'Yes' when prompted to confirm the deletion.
 

These may have been installed by third-party printer setup programs and may be interfering with the print spool service.

 b) Go to 

Computer\HKEY_LOCAL_MACHINE\SYSTEM\CurrentControlSet\Control\Print\Monitors
Inside the list of subkeys, there should only be the following subkeys for the default print monitors:
>BJ Language Monitor
>Local Port
>PJL Language Monitor
>Standard TCP/IP Port
>USB Monitor
If there are any subkeys other than the subkeys listed above, Export registry, name it 'Monitorsx86'
- Delete all the subkeys other than listed above.

 c) Exit Registry Editor.
 

If a printer is attached to the computer, disconnect the printer cable from the computer and then restart the computer.

Attach Printer, check whether it works or not, Install printer if not detected.


If problem persists, again do Step 1) & Step 2) then
3) Open Regedit 

 a) Go to

Computer\HKEY_LOCAL_MACHINE\SYSTEM\CurrentControlSet\Control\Print\Printers
-> Export registry, name it 'Printers' 

-> Delete ALL the subkeys

 b) Go to

Computer\HKEY_LOCAL_MACHINE\SYSTEM\CurrentControlSet\Control\Print\Environments\Windows x64\Drivers
-> Export registry, name it 'Drivers' 

-> Delete ALL the subkeys

c) Go to
Computer\HKEY_LOCAL_MACHINE\SYSTEM\CurrentControlSet\Control\Print\Environments\Windows x64\Print Processors
-> Export registry, name it 'PrintProcessors' -> Delete ALL the subkeys
-> Close Registry and Restart Computer.


4) Go to "Turn Windows features on or off" in the control panel
 - Uncheck "Windows Fax and Scan"
 - Reboot


5) Go to "Turn Windows features on or off" in the control panel
 - Recheck "Windows Fax and Scan"
 - Reboot

At this point you should have a stable print spooler.

Add printer now. 
Get the absolute latest printer driver from your manufacturer
(make sure it supports your Operating System Version). 


If you use multiple printer, Add each printer one at a time:

- Add the printer 
- Restart 
- See if it works.
- Add next printer. 


How to Export Windows Registry File

Windows Registry

Registry is very Delicate and at the same time very very important part of computer, whenever you try to modify registry:

-Be very much precise and very much accurate

-Take extra care as very small mistake by you which you wouldn't even remember may lead to serious problem.


It is strongly recommended to Export or save your registry entries before modifying it.

What to do?
-Just Follow these simple steps (accurately)

1) Open Registry editor
     Start -> Run -> Regedit -> Enter (allow if asks for permission)

Run

 2) In Menu bar Go to:
     File -> Export

Export Registry

 3) In File name, give name of the registry file(which will remind you its use)

4) Under Export Range, do one of the following:
   - To back up the entire registry, click All (done once for taking entire backup) 
   - To back up only a particular branch of the registry tree, click Selected branch and enter the name of the branch you want to export (By Default, the branch selected by you in registry window will reflect here)

Export Range


5) Click Save

Warning

Warning: Serious problems might occur if you modify the registry incorrectly by using Registry Editor or by using another method. These problems might require that you reinstall the operating system. We cannot guarantee that these problems can be solved. Modify the registry at your own risk.


How to import a Registry key?
- In Windows Explorer, double-click the Saved Registry file(.reg extension)
- This will import the file into the computer's registry


Reference:  

http://technet.microsoft.com/en-us/library/cc781982%28v=ws.10%29.aspx