Showing posts with label windows trick. Show all posts

Tuesday, April 16, 2013

Spooler Subsystem Application has Stopped Working - Solved

Problem: 

Printer, which was working fine previously, all of a sudden Shows an Error "Spooler Subsystem Application has Stopped Working" after giving print command.

My Friend had suffered this problem and had informed me about it. Yesterday it was printing perfectly fine today showing this error!

After checking the system, I came to conclusion that it was the Service 'Print Spooler' (process- spoolsv.exe) which repeatedly kept crashing all the time.

A print spooler is software that temporarily stores print jobs on the computer hard disk or in memory until the printer is ready to print them.

So, what is the reason behind this sudden change?
'Unknown' is the one word answer to it. 
But after reading comments in Microsoft forum by Lots and lots of people(who faced this issue) , some points came in majority:
- Mostly, Vista users were facing this problem. Compatibility issue between 'printer driver' and 'some update for vista' may be the Major cause.
- Default port for Printing found changed
- Some issue with 'Adobe Acrobat drivers' also came in picture(reinstall all acrobat software like adobe reader, flash player etc if your Acrobat is also showing problem)
- Sometimes Print Spooler behaves starnge when more documents get stuck in the print queue.


Solution

Method I

Make sure Default port set in Printer Properties is same as the Port used by you to connect Printer with computer. Updates sometime reset it.

Mostly Printer is connected using:
1) LPT Port
LPT Port - Male

LPT Port - Female

2) USB Port


You must check Printer Properties now.

Go to:
-Start -> Control panel -> Device and Printer ('Printer and Faxes' in some versions)
-Look for your Printer,
-Right click Printer icon-> Properties
-Look for 'Port' in tabs there, check whether the port selected and Port used by Printer to connect your PC is same or not. 

-If not, then Select the appropriate one.

If this doesn't solve the issue, try next Method.


Method II

Since, Major cause of this problem seems 'update' So it is better to do System Restore(if it was kept ON)

Restore your Computer to any date which is earlier to the date when Printer was working fine.
If you had taken print on 10th of April then restore it to any date before 9th April.

Go to:
- Start -> Accessories -> System Tools -> System Restore
- Restore to earlier date
- Choose the Date as discussed above
- Restore

This must solve problem for most of you as it did in my Friend's case.

If it doesn't, Don't worry!!

Next method is one which Most people found helpful.

Wonder why I still kept it Third?
- As many of them didn't try above simpler Methods.


Method III

If you came to this Method then you must carry your Printer Driver CD with you. If you lost it, then Download it from internet using your proper Printer Model in Search engine.

Let us Start now:

Go to:
- Start -> Control panel -> Programs and Features ->  click 'Turn Windows features on or off'


Turn Windows Feature ON or OFF


Windows Features
-Click + sign of Print services

-Select LPD and LPR-> OK
(let it complete)


-Now again go to the same and Remove ‘Internet Printing Client
-> OK


-Restart your PC to ensure there is no error of spooler service.


-Reinstall your printer driver.


I am sure, Very few of you still have the error!!

For those who do, follow Next Method.


Method IV

Precaution: As now we will change registry entries, it is strongly recommended to back up your system, create System Restore checkpoint and export registry before each step.


How to export registry?
- check this page:  'Export Registry'

Let us Start now:


1) Reboot the machine into SAFE mode.
 

2) Go and Delete All the files from:
C:\Windows\System32\spool\drivers\x64\
C:\Windows\System32\spool\drivers\W32X86\

C:\Windows\System32\spool\PRINTERS 
(If you wish, you can cut and paste to different location)
 

Next few steps involve the Registry So make sure to Back up the Registry

3) Open Regedit 


 a) Go to

Computer\HKEY_LOCAL_MACHINE\SYSTEM\CurrentControlSet\Control\Print\Environments\Windows NT x86
 

Inside the subkey list, there should only be the following subkeys:
>Drivers
>Print Processors
 

If there are any subkeys other than the subkeys that are listed above, 
- Export registry, name it 'WindowsNTx86'
- Delete all the subkeys other than listed above.
To do this, right-click each subkey to be deleted, click 'Delete'.
Click 'Yes' when prompted to confirm the deletion.
 

These may have been installed by third-party printer setup programs and may be interfering with the print spool service.

 b) Go to 

Computer\HKEY_LOCAL_MACHINE\SYSTEM\CurrentControlSet\Control\Print\Monitors
Inside the list of subkeys, there should only be the following subkeys for the default print monitors:
>BJ Language Monitor
>Local Port
>PJL Language Monitor
>Standard TCP/IP Port
>USB Monitor
If there are any subkeys other than the subkeys listed above, Export registry, name it 'Monitorsx86'
- Delete all the subkeys other than listed above.

 c) Exit Registry Editor.
 

If a printer is attached to the computer, disconnect the printer cable from the computer and then restart the computer.

Attach Printer, check whether it works or not, Install printer if not detected.


If problem persists, again do Step 1) & Step 2) then
3) Open Regedit 

 a) Go to

Computer\HKEY_LOCAL_MACHINE\SYSTEM\CurrentControlSet\Control\Print\Printers
-> Export registry, name it 'Printers' 

-> Delete ALL the subkeys

 b) Go to

Computer\HKEY_LOCAL_MACHINE\SYSTEM\CurrentControlSet\Control\Print\Environments\Windows x64\Drivers
-> Export registry, name it 'Drivers' 

-> Delete ALL the subkeys

c) Go to
Computer\HKEY_LOCAL_MACHINE\SYSTEM\CurrentControlSet\Control\Print\Environments\Windows x64\Print Processors
-> Export registry, name it 'PrintProcessors' -> Delete ALL the subkeys
-> Close Registry and Restart Computer.


4) Go to "Turn Windows features on or off" in the control panel
 - Uncheck "Windows Fax and Scan"
 - Reboot


5) Go to "Turn Windows features on or off" in the control panel
 - Recheck "Windows Fax and Scan"
 - Reboot

At this point you should have a stable print spooler.

Add printer now. 
Get the absolute latest printer driver from your manufacturer
(make sure it supports your Operating System Version). 


If you use multiple printer, Add each printer one at a time:

- Add the printer 
- Restart 
- See if it works.
- Add next printer. 


Sunday, March 24, 2013

How to Remove Googleupdate.exe completely

remove googleupdate.exe

Most of us use at least one Google software. Be it Google chrome, Gtalk, Google Earth or other.

Yes they are awesome, but it is annoying  to see ‘googleupdate.exe’ whenever  we check Task Manager.

When all other software gets updated in 5-10 minutes, Why Google needs to update all the time?

If you read security articles frequently, some Android(google supported) Apps reported to Upload privacy data via updates

And if you end it, it will again come and irritate you.


Solution


How to remove googleupdate.exe completely?

 
Well you have to take lot of pain to remove it completely. Follow these steps:
 

1) Block at Firewall

Go to:  Control Panel -> Windows Firewall -> Exception tab
Uncheck ‘googleupdate’  from there if present


2) Block at Task Schedular


Go to: Control Panel -> Schedule Tasks (win xp)
          Control Panel -> System and Security -> Task scheduler (win 7)
 

Find ‘GoogleUpdateTaskUser’ kind of entry -> Delete it 
Scheduled task
Task Schedular

(if it comes again after reboot, then disable it)
 

3) End process in Task Manager

Alt+ctrl+Del -> Task Manager -> ‘Process’ tab -> Right click on ‘googleupdate.exe’ -> End processes

Task manager
Task Manager


4) Stop its service
 

Run -> type ‘Services.msc’ -> Double click ‘googleupdate’ -> select ‘Disabled’ in start up type
 

5) Remove ‘googleupdate.exe’ completely
 

Open ‘Run’ type following paths :
%userprofile%\local settings\application data\google\
c:\Program Files\Google\
 

Open ‘Update’ folder -> delete ‘googleupdate.exe’ from there (can delete everything there)
 

Go back to 'google' folder -> right click ->properties -> Security tab -> edit
In the new ‘Permission and Update’ window
Select a user -> in Permission section, check ‘Deny’ in Full control
Repeat this for each users(must have Administrator rights) -> Apply -> OK

Permisssion


6) Remove from start up
 

Run->msconfig->Startup tab
Uncheck ‘Googleupdate’ from there

msconfig
Msconfig


apply -> ok -> restart


Restart


After restart, Check 'Don't show...' thing in the window that will come after start up and click OK.
 

Done!!

This will surely remove Googleupdate.exe and do all the changes to prevent it from coming.

still after reboot, check these two paths in registry:

(These part is used by Windows to auto run processes on startup)
HKEY_LOCAL_MACHINE\SOFTWARE\Microsoft\Windows\CurrentVersion\Run
HKEY_CURRENT_USER\Software\Microsoft\Windows\CurrentVersion\Run

(Run->Regedit-> go to specified path by expanding each parent 'Entry name')

if you find the Google Update value, simply delete that one, and the process won't be started again on next Windows reboot.


Does this article helped you removing googleupdate.exe ?

Tell us through comments.


Surf freely !!
:) :)

Monday, March 18, 2013

How to Shutdown PC Automatically


Many a times, we feel need of something that can shutdown our PC after sometime, say after 30 minutes.

-while continuing any download, it needs to go outside, then even if Download is 80% over, we have to shut it down.
-while converting a file if any emergency comes in between, then we think, wish someone shut down my PC after 40 minutes!
-while using PC/ Laptop in night, many a times, we sleep without shutting it down and it is ON for entire Night.
auto shut down pc


In many such cases, either we left our PC open for too long time without any use(wasting Power)  or we have to shut it down unwillingly.

I have a solution for you that too without need of installing any software(installing too much software also slows down your system).


Solution

Here is a VbScript Program written specially to solve this Problem. 

To enable you Automatically Shutdown your PC at your own wish after the time specified by you.

How to achieve it?

Option 1:


-Download this Zipped file: Autoshut
-Extract the file: right click on zipped file->Extract here->Give password: techsoln
-Now you have the file 'Auto shutdown_Tech-Soln.vbs' . Use when you need 'Automatic shut down your PC' with simple procedure as discussed below.

Option 2:

 -Create the Vbscript yourself:

Let us see the script first:


Dim Ans
Dim Time

set oShell = createobject("wscript.shell")
Set Sapi = Wscript.CreateObject("SAPI.SpVoice")

Ans = InputBox(" Do You Wish to Auto Shutdown this PC ?       Press Y/N  ","  AutoShut  by Tech-Soln")

if Ans = "Y" then
Time = InputBox("After how many minutes Should this PC Shutdown Automatically ? ","  Time in Minutes  by Tech-Soln")
Sapi.speak Time + "minutes left for pc to shutdown Automatically, You can relax without tension  Brought to you by Tech-Soln.blogspot.com "
oShell.Run "shutdown.exe -s -t " & (Time * 60) & " -f -c ""This PC is set for Automatic Shutdown, Finish and save current work. To Cancel Auto Shutdown, Reopen this File And Press N"""

end if
if Ans = "N" then
Sapi.speak " Have a nice day ahead! Keep Smiling! "
oShell.run "shutdown.exe -a"
end if
 

What you have to do?
- Copy entire script from above(with precaution)
- Open Notepad
   Click 'Start'-> Type 'Notepad' in search box->open (Win vista & Win 7)
   Click 'Start'->Run-> Type 'Notepad'-> enter (Win XP)

- Paste
- Go to 'File'->'Save as'
- In save as Window, in save as type, select 'All Files' , In File Name, give any name but put '.vbs' in the end. For example, 'AutoShut.vbs'
-Save it preferably in Desktop(for easy access)

Save As

Saturday, March 16, 2013

How to Know PC's Gender

PC
Do you know whether your PC or Laptop is Male or Female?
Surprised??

- I'll show you how to verify. I am not kidding, you will listen his/her voice yourself.


Still don't believe me!!

Let me show you,

It is just simple code, You have two Options now


Option 1:

-Download the zipped file: PC Gender
-Extract the file: right click on zipped file->Extract here->Give password: techsoln
-Now you have the file 'Auto shutdown_Tech-Soln.vbs' .

Option 2: 


-Create the File yourself
-Open Notepad and write this simple code or just copy & Paste(with precaution) :


CreateObject("SAPI.SpVoice").Speak"I Love You"


Save as this as ' PC_Gender.vbs ' as shown in figure:

Save as ' PC_Gender.vbs '

Now to know Gender of your PC, Keep your PC Speaker ON and double click on ' PC_Gender.vbs ' and Listen its voice, whether it is Male Voice or Female Voice?


My Mom used to say, My Laptop is my girlfriend as I always keep it with me.
And it turned out to be Female. :)

But My Working PC is Male. :(

Check yours and tell me.


Have Fun :) 


Friday, March 15, 2013

Play Incomplete Downloaded Videos in IDM


Many a times, while downloading video from IDM, some of video remains incomplete and don't allow to resume.
If it stops at 99% or 98% it is very irritating for us. We again download it from very beginning, which is time consuming and also entire data is again downloaded.

IDM home screen
If you have also faced above problem, then this blog will bring smile to your face.
Because you can search those incomplete files in your system and even play them(if they more than 90% downloaded).

Let us see how!!


Run

Step I : Open Appdata

->Click 'Start'
(win XP user) -> click 'Run'
(Win 7 user) in search box -> type 'Run' -> open
->Type ' %appdata% '


Step II : Browse Folder where file is

   
Go to 'IDM' -> 'DwnlData' -> User ->
Now, you have to apply your brain.

Here each folder is for each downloaded files(generally) whether complete(less in size) or incomplete(large in size).

Look for the folder which is large in size, Open it.
Here is screenshot of one such folder, the 'User name' is blackened for anonymity.

A Folder where in incomplete files are saved

 Since, IDM breaks files into multiple files, so it shows multiple files.
If it is single file(some website doesn't allow multiple download) then here you will find one larger file.

Step III : check and Play the files  


Leave the Log file, Drag and drop each large files in multi-format supported Player like- 'VLC player' or 'Media Player Classic'.


Hurray!! Now your incomplete downloads are accessible to you!!


Don't forget to Leave your comments and experiences, I'll be answering if any query is there.


Enjoy!!

Thursday, February 28, 2013

how to Disable write protection from pendrive

We received problem from our Reader regarding "Removing write protection from Pendrive". Here we will try to solve it.

What is write protection?
SD Card with Lock
- Write Protection is a feature(yes you read it right) that is generally found in flash drives like pen drives and memory card. It prohibits users to write anything to the drive, thus protect the drive from any modification to its data and also stops virus(from computer) to Copy(write) itself to the drive.

Initially, it was done using a small physical (hard)switch located in the Pendrive and memory card. The small yellow switch in this snap is for write protection. Similar, switch is used in any side of some pendrives.

Now, this feature is also being achieved digitally without any Hardware.

Why is it a problem then?
-it is a Problem when:
  a) we don't know about it and it prohibits us from writing
  b) it is (digitally) implemented without user consent either by someone or by Virus

Solution

First of all, make sure if there is any physical Switch is present or not, if it is then adjust it to unlock side.
If there is no physical switch or still problem persists, Go ahead.

As many a times it is done by virus also, it is suggested to scan your system including pendrive with a good updated Antivirus, if you don't have any then Download and install MalwareBytes, update it and do the scan.
For detail information of Virus cleaning, check : clean virus  

UPDATE

I have found a simple trick which also solves this problem (when your USB Device has minor problem only). Try this :

1) Right click 'My computer' -> Manage or Management -> Disk management
2) select your USB drive -> Right click ->"change drive letter and paths"
3) Then Rename it to a different letter

Check whether it starts working or not !!

 Note: Quotes( ' ) are used for information only, whenever you are asked to type, do without the quotes. Ex:  if asked to type 'abc'. Then don't put quotations ( ' ) while typing, type only
abc
    
 Method I : Using Diskpart


First we will try to remove read only attribute from the specific drive.

Warning : Be sure to do this on the right disk since the diskpart command can do serious damage if you run it on the wrong disk.

1)  Start Menu -> Run(or in search box) -> Type 'cmd' -> press 'Enter' -> Command Promt will open
2) Type 'Diskpart' -> enter ->  'list disk' -> enter
3) Select the disk you are going to modify, if your required USB disk is in 'disk 4' then 
4) type 'select disk 4' -> enter , now disk 4 is selected,  'list disk' will show star(*) beside it
5) 'list disk' -> enter 
To Clear the Read-Only attribute on the selected disk (To Disable write protection):
6) Type 'attributes disk clear readonly' -> enter
The disk is no longer Write protected. The Read-Only attribute is removed.

If you wish to set the write protection again, just do the same procedure and
Type 'attributes disk set readonly' -> enter

When you are done modifying the disk attributes just issue the exit command
7) Type 'exit' -> enter

If files inside USB drive are still in read only mode
-open command prompt
-Type ' j: ' -> enter (put your drive label in place of 'j' )
- Type ' attrib -r /s /d *.* ' -> enter
- exit


Method II : Using RegEdit


This will Remove write protection from USB Drives. If it doesn't then lets disable writeprotect from your System Using Registry Editor:

1) Start Menu -> Run(or in search box) -> Type 'regedit' -> press 'Enter' -> Registry Editor will open
2) Expand by clicking ' + ' and Navigate to the following path :

HKEY_LOCAL_MACHINE\SYSTEM\CurrentControlSet\Control\StorageDevicePolicies


If you can't find  'StorageDevicePolicies', then you have to create the key:
-Right click on ' control '-> New -> Key -> a new key will get created -> rename it as 'StorageDevicePolicies'
-Right click on 'StorageDevicePolicies
-> New -> DWORD (32-bit) Value -> Name it as 'WriteProtect'
writeProtect to storage device policies

Now if you want to enable write protection, use ' 3) ' , to Disable write protection, use ' 4) '

3)To Enable Write protect, Double click on 'WriteProtect', and set its value data to '1'
Edit DWORD value
Once set, all users on the computer is now blocked and prevented from copying, transferring or writing any files, documents and data to the USB disk drives.
4)To Disable Write protect, Double click on 'WriteProtect', and set its value data to '0'
Once reset to '0', all users on the computer is now allowed to copy, transfer or write any file, document and data to the USB disk drives.

5)close your registry edit window.

For first time, you may get that same message again, close the notification window and try to write to the USB again and it should work. You’ll probably have to do this with all your USB drives to clear that “Disk is write protected” message. Hope this helped.

If still same problem then You have to go for Formatting it.

Method III : Using Formatting

Try Formatting by Disk Management
If it doesn't format.

Try these tools:
1) Download Neo 9
(Zipped with Password - techsoln )
2) Transcend's Online Recovery Tool
3)  Apacer Formatting Utility
(Zipped with Password - techsoln )  

Using 1st two is simple.

For using  Apacer Formatting Utility, 
Unzip this utility to preferably on a folder on desktop for easy access (Do Not Save it on pen drive).
Keep your pen drive plugged in
Double click on the 'Start.bat' file in the folder where you unzipped the above utility.
This will start formatting your pen drive, wait till the formatting completes and the LED on your pen drive stops blinking.
Remove your pen drive and plug it in again.


If you still face same problem, go to service center. If you have warranty left then replace your pendrive.

Happy Computing :)

(If you liked it, then click 'g +' below and don't forget to comment)


Monday, February 18, 2013

How to Recover hidden files from Pendrive after virus infection


Mostly pen drive doesn't consist any security measures. Since we use Pen drive in many PC/Laptops it very easily gets infected with viruses and malwares. 

We can easily get rid of these Malwares by scanning it with any good updated Antivirus (no need of Format as it leads to Data loss).

Problem arises when we try to access our data stored in the pen drive.
When we check property of the USB Drive, Disk usage shows there are files in the pen drive but inside pen drive we can't find any!!
Rather we are left with some Shortcuts sometimes.

Don't worry All the files are safe only they are made Hidden by the virus.


To show your hidden files you can follow this link : "Show"


To unhide your files and folders follow these simple steps:

1) Open command prompt:
     (Win 7 & vista) : 
  start->cmd (in search) -> open
It is better to open cmd as administrator:
right click the cmd icon (from search)->-> run as administrator(give admin password if required, else use normal run)

     (Win xp users) :
  start -> run -> type cmd -> Ok


command prompt will open now.

2) Check Drive Letter of you pen drive from 'My Computer'.
Pendrive drive letterFor example, If it is labelled as "e: drive"
     
-> type 'e:' hit enter

now pointer location will go to the drive.
 
3) type this command and hit enter :
     attrib -r -s -h *.* /s /d


attrib command

Hurray, all your files and folders are visible to you now!!
:) :)

Tuesday, November 27, 2012

How to increase your Internet speed by 20%

Let me ask one question to you

Do you know, Most of the people Don't use their internet speed to their full potential?

Yes, You read it right.. Most of you don't use their maximum internet speed.

Internet speed depends on two factors:
1. External Factors
2. Internal Factors

External Factors can be taken care by checking your internet speed by any speed testing websites and matching that with the speed, your service provider has promised you to provide.

By 'Internal Factor' I mean, whether you use 100% of the speed being recieved on port/wifi device of your computer or not ?

Truth is, most of us use only 80% of the internet speed being received. Rest 20% is reserved by
default for windows.

 Solution


To Utilize 100% of your internet speed, follow these simple procedure:
 
-> Go to "Start->Run"
-> type "gpedit.msc" enter
-> Go to "computer configuration->administrative templates->network->Qos packet scheduler"
-> double click on "Limit reservable bandwidth" 
-> in the window select enable and set it to '0'
-> 'apply->ok'

close the window and enjoy :)

you can revert it anytime you wish to by "selecting not configured"


Happy speedy surfing :)


Tuesday, August 14, 2012

How to fix Registry editing has been disabled by Your administrator


You try to run regedit form start menu you are getting an error like this 'Registry editing has been disabled by administrator'


 Regedit is widely used to successfully remove Virus and their effects. This is also the reason why virus makers love to disable the Registry Editor so it makes solving the problem and removing the issue difficult.

Viruses are not always the reason for this issue sometimes administrators in IT departments place a restrictions on using the regedit command to keep employees from changes things on company computers.

 Let us look at the solution to fix it:

 Solution 1: Using the Group Policy Editor

  • Start -> Run -> gpedit.msc and press ENTER
  • Expand the '+' sign to go to the following location: User Configuration ->Administrative Templates -> System
  • Double-click 'Prevent access to registry editing tools' and set it to Not Configured
  • Exit the Group Policy Editor
    Note: 
    If the setting already reads Not Configured, set it to Enabled, and click Apply. Then revert it back to Not Configured. This ensures that the DisableRegistryTools registry value is removed successfully.


Solution 2: Using the REG.EXE console tool  

Start -> Run -> type this command:

REG add HKCU\Software\Microsoft\Windows\CurrentVersion\Policies\System /v DisableRegistryTools /t REG_DWORD /d 0 /f

Solution 3:
Symantec has developed a tool UnHookexec.inf which makes access to registry editing easy and sets their registry values to their default values. It is an inf file right click the tool and install . 

Solution 4:

Download this VB script file from doug Knox Website and run it .If you get any warning click ok to continue. After VB Script file enables registry editor ,restart your computer and access registry.


Solution 5:

Some viruses and other malware will load a regedit.com file that is many times a zero byte dummy file. Because .com files have preference over .exe files when executed if you type REGEDIT in the run line, it will run the regedit.com instead of the real regedit.exe file.

Delete the regedit.com file if its a zero byte file to restore access to REGEDIT. In some cases, such as the W32.Navidad worm, you'll need to rename the REGEDIT file to get it to work.

 Happy Troubleshooting ...

:)

Friday, August 10, 2012

How to Restore " Show Hidden Files and Folders " or " Folder Options "

When your system is infected with virus,first one to be get affected is "Show Hidden Files and Folders"(in Win 7 / Vista) or "Folder options" (in Windows XP). 
Folder options entry will not  appear in Windows Explorer to see hidden files and folders. Hence Virus can safely hide itself in your system

In Win7/ Vista

 "Folder and search option" will look like: 

computer has no option for “Show Hidden Files and Folders” in the Folder Options dialog.

 In Windows XP

 "Folder options"(shown in fig.) will not be available in the Windows Explorer Tools menu.

Solution:

 For Win 7/ Vista

Open regedit.exe through the start menu search or run box, then navigate down to the following key. 

[HKEY_LOCAL_MACHINE\SOFTWARE\Microsoft\Windows\CurrentVersion\explorer
\Advanced\Folder\Hidden]

 On the right-hand side, Look for a key "Type" and change its value to "group"as shown above. 
If the key does not exist, create a new String value.

You should be able to immediately re-open the folder properties, and the option should have returned, as you can see here:

For Window XP


Start menu->Run-> Type "regedit.exe" ->Enter 
Registry editor will open, then navigate down to the following key:

 [HKEY_CURRENT_USER\Software\Microsoft\Windows\CurrentVersion\Policies\Explorer] 

On the right panel, Look for a value called "NoFolderOptions"

Right click on the NoFolderOptions value and choose delete


Now Navigate to: 

 [HKEY_LOCAL_MACHINE\Software\Microsoft\Windows\CurrentVersion\Policies\Explorer]     


Right click on "NoFolderOptions" on the right panel and choose Delete. 

Thursday, August 9, 2012

How to Show Hidden files in Windows 7, Vista, XP using GUI , Command line


Where have my Files Gone?  


Have you faced the situation, when you couldn't find your important file in your Pen-drive or hard disk but disk space usage still the same?
- Don't Panic, your files are safe they have just got hidden(by virus or some person)
-All you need is to either  

   a) Show your hidden files
         OR
   b) Un-hide your files

Show your hidden files 


Opening Folder Option is different for XP & Win 7

        For Windows 7/ windows Vista


Open My computer or any folder.

Click Organize button -> select Folder and Search Options

            For Windows XP


Open My computer or any folder.

In Menu Bar Click Tools -> select Folder Options


After Folder Options is opened use following process for both OS 


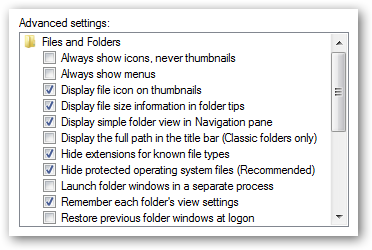
Click  the View tab->select Show hidden files and folders

In Advanced settings:
  •  Select Show hidden files and folders
  •  Uncheck Hide extensions for known file types
  •  Uncheck Hide protected operating system files
  •  Select yes in the next window asked
  •  Click Apply
  •  OK


Now all Hidden files in your system is visible to you. Don't delete any unknown files as it may be windows system files.


Un-hide your files

Click the Start button in the lower left corner of your task bar.

Update: some lines are changed as from previous to minimize confusion & make the Readers understand in better way. 
  • Win 7/Vista users-> Type cmd in the search box and press Enter. 
  • Windows XP users-> click Run and type cmd into the Run box.
  • Go to the required Folder(Directory) using cd command,ie, If required files are in f: drive then type f: then Enter
Type attrib -s -h -r *.* /s /d and press Enter.

Else you can provide path of that folder(as shown in address bar) and make it unhide.

For example, 
1) if the required folder name "xyz" and it is  in f: drive. (path: f:\xyz\)
Type attrib -s -h -r f:\xyz\*.* /s /d and press Enter.

2) if folder name contains blank space, then Put the path in double quotes ( "") and provide exact path(also check no. of blank spaces)
if required folder is : flash games in c: drive. (path is- c:\flash games\)

Type attrib -s -h -r "c:\flash games\*.*" /s /d  and press Enter.


command prompt

Now all the Files in that Folders are visible to you.

Note: here, to show value of no. of 'blank space' , I put an extra blank space in the folder name, so required path became: 
c:\flash  games instead of
c:\flash games 
and running the above command returned me an error as shown in the snapshot. I corrected the name of the folder, then the command run perfectly.

IF you are Unable to find "Show Hidden Files and Folders" or "Folder options" click Restore

Feel free to ask your queries.