Showing posts with label Solution. Show all posts

Thursday, December 12, 2013

Files missing from external Drive but space is still used

Hello Friends, Today's post is the Solution to the problem faced by one our blog audience.

It really was a strange problem, 
Some of his important files from External Drive suddenly gone missing but disk space was still being used

Some ~400GB space was being used but not accessible. Rest files and folders were present.

First I thought it to be simple hidden files case and tried to unhide all files of HDD as explained in previous posts.
But to my surprise, nothing came out.

Even checked for virus activity but returned with no medals!! :D 

Tried to view all files using Command prompt(as nothing can be hidden from it), there also I couldn't find those missing files

  Solution

Then we tried the old school concept of Check-disk, and the person's joy was on cloud 9!!
This command checks the Disk for errors and bad sectors also repairs and recovers readable information if possible.

 Note: this solution is valid for internal Hard disk also

Steps:

Insert the external drive,note down its drive letter, here mine was F  drive. Close everything then follow these:
 
Open Command prompt:
-> Press Windows key + r (small Run window will open)
-> Type cmd
-> click Ok or hit enter

This will open command prompt window.Go to the drive and perform check-disk commands:
-> Type f:  
(here in place of f put the drive letter of your disk)
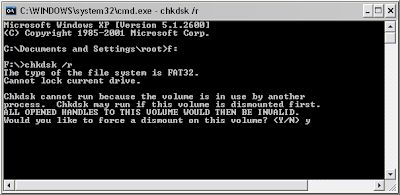
-> chkdsk /r

it will ask for confirmation, like this (different on different type of drives)
chkdsk

chkdsk command

 -> Press y and hit enter

In case you get what is shown in 1st snap, then restart your system, don't press anything, it will start disk check in boot only.

In case you get what is shown on 2nd snap, then your disk check will start immediately.

Entire process may take 40 minutes to hours depending on disk space of that drive and also no. of bad sectors or disk errors it finds.

Cause:

After discussing with him, I came to conclusion that his habit of not using "Safely remove drive" was the cause of it.


Tell us your Problems, We will try our best to provide their Solution.

Happy Computing
:) :)


Monday, October 28, 2013

WhatsApp error: your phone date is inaccurate SOLVED

Hello Friends,

This is the problem People face while initializing WhatsApp.

When we initialize WhatsApp (mobile, Tab anywhere), it shows an error -

Your phone date is inaccurate! Adjust your clock and try again.


WhatsApp error Your Phone date is inaccurate
I also faced this error.

I tried everything i could...
- Automatic time settings
- manual time settings
- restarted then phone :P :P

Then I found the solution and cause of the error.

Actually, this error comes due to older version of installed WhatsApp  


Solution

Just Update your WhatsApp application

Steps:

Go to -> Play Store -> search 'WhatsApp'
it'll look like this (may be different based on different platform)

WhatsApp error solved


- > Choose UPDATE

Done!!

Now you can enjoy with your WhatsApp!!

- If it doesn't solves your problem, uninstall it and again Reinstall 

Happy Chatting!!
:) :)

Thursday, June 27, 2013

Facebook Unresponsive Script Error Solved - https://fbstatic-a.akamaihd.net/

Hello Friends, 
FB Error Solved

Today I am sharing Solution of the problem I was facing from many days and after searching about it I came to know that I am not the only one!! (gives pleasure when you are not the only sufferer :D :D  )

Problem :

Using Facebook with some tabs open for more than 15- 20 minutes, a Script error comes with Heading 'warning: unresponsive Script' :
(Later part of the script differs when it is generated again or different in system)
https://fbstatic-a.akamaihd.net/rsrc.php/v2/yw/r/80Iw8OZOF5Q.js:57
Script error
 and browsers hangs up.

Browser Affected: all (I am using Mozzilla Firefox, but after googling the problem suggested this problem is with all browsers)

Cause : 
might be issue due to Image Fetching from "akamaihd.net"

In Simple words, The images uploaded to Facebook(not hosted on Facebook Server), are actually being hosted by akamaihd.net, a CDN (content delivery network) you can say, a third party provider.

How can I say that images are not hosted on Facebook but on akamaihd.net ??
- Well, go to any image you have uploaded in your time line -> right click on image -> view image(Firefox) or open image in new tab(in chrome)
check the address bar now, it will look like:

 https://fbcdn-sphotos-e-a.akamaihd.net/hphotos-ak-ash4/q71/1044574_651080944920330_1908721470_n.jpg


Look at the highlighted section.(sorry, if the image made your mouth flooded )


Solution : 

 Restoring the browser to factory settings or creating a new Profile for browser may solve this but only for sometime.
Till now, I came to only one perfect solution that too for Mozilla Firefox only. 
it is an addon of firefox 'FB Phishing Protector' , version 4.3 onwards solves this problem
check it Here
if you wish to check its other versions, Go Here
Just add it... Done!!

Happy Facebooking!!
:) :)


Source :

http://www.codefap.com/2013/01/what-is-akamaihd-net-in-a-facebook-link/ 

http://forums.mozillazine.org/viewtopic.php?f=38&t=2624819


Tuesday, April 16, 2013

Spooler Subsystem Application has Stopped Working - Solved

Problem: 

Printer, which was working fine previously, all of a sudden Shows an Error "Spooler Subsystem Application has Stopped Working" after giving print command.

My Friend had suffered this problem and had informed me about it. Yesterday it was printing perfectly fine today showing this error!

After checking the system, I came to conclusion that it was the Service 'Print Spooler' (process- spoolsv.exe) which repeatedly kept crashing all the time.

A print spooler is software that temporarily stores print jobs on the computer hard disk or in memory until the printer is ready to print them.

So, what is the reason behind this sudden change?
'Unknown' is the one word answer to it. 
But after reading comments in Microsoft forum by Lots and lots of people(who faced this issue) , some points came in majority:
- Mostly, Vista users were facing this problem. Compatibility issue between 'printer driver' and 'some update for vista' may be the Major cause.
- Default port for Printing found changed
- Some issue with 'Adobe Acrobat drivers' also came in picture(reinstall all acrobat software like adobe reader, flash player etc if your Acrobat is also showing problem)
- Sometimes Print Spooler behaves starnge when more documents get stuck in the print queue.


Solution

Method I

Make sure Default port set in Printer Properties is same as the Port used by you to connect Printer with computer. Updates sometime reset it.

Mostly Printer is connected using:
1) LPT Port
LPT Port - Male

LPT Port - Female

2) USB Port


You must check Printer Properties now.

Go to:
-Start -> Control panel -> Device and Printer ('Printer and Faxes' in some versions)
-Look for your Printer,
-Right click Printer icon-> Properties
-Look for 'Port' in tabs there, check whether the port selected and Port used by Printer to connect your PC is same or not. 

-If not, then Select the appropriate one.

If this doesn't solve the issue, try next Method.


Method II

Since, Major cause of this problem seems 'update' So it is better to do System Restore(if it was kept ON)

Restore your Computer to any date which is earlier to the date when Printer was working fine.
If you had taken print on 10th of April then restore it to any date before 9th April.

Go to:
- Start -> Accessories -> System Tools -> System Restore
- Restore to earlier date
- Choose the Date as discussed above
- Restore

This must solve problem for most of you as it did in my Friend's case.

If it doesn't, Don't worry!!

Next method is one which Most people found helpful.

Wonder why I still kept it Third?
- As many of them didn't try above simpler Methods.


Method III

If you came to this Method then you must carry your Printer Driver CD with you. If you lost it, then Download it from internet using your proper Printer Model in Search engine.

Let us Start now:

Go to:
- Start -> Control panel -> Programs and Features ->  click 'Turn Windows features on or off'


Turn Windows Feature ON or OFF


Windows Features
-Click + sign of Print services

-Select LPD and LPR-> OK
(let it complete)


-Now again go to the same and Remove ‘Internet Printing Client’
-> OK


-Restart your PC to ensure there is no error of spooler service.


-Reinstall your printer driver.


I am sure, Very few of you still have the error!!

For those who do, follow Next Method.


Method IV

Precaution: As now we will change registry entries, it is strongly recommended to back up your system, create System Restore checkpoint and export registry before each step.


How to export registry?
- check this page:  'Export Registry'

Let us Start now:


1) Reboot the machine into SAFE mode.
 

2) Go and Delete All the files from:
C:\Windows\System32\spool\drivers\x64\
C:\Windows\System32\spool\drivers\W32X86\

C:\Windows\System32\spool\PRINTERS 
(If you wish, you can cut and paste to different location)
 

Next few steps involve the Registry So make sure to Back up the Registry

3) Open Regedit 


 a) Go to

Computer\HKEY_LOCAL_MACHINE\SYSTEM\CurrentControlSet\Control\Print\Environments\Windows NT x86
 

Inside the subkey list, there should only be the following subkeys:
>Drivers
>Print Processors
 

If there are any subkeys other than the subkeys that are listed above, 
- Export registry, name it 'WindowsNTx86'
- Delete all the subkeys other than listed above.
To do this, right-click each subkey to be deleted, click 'Delete'.
Click 'Yes' when prompted to confirm the deletion.
 

These may have been installed by third-party printer setup programs and may be interfering with the print spool service.

 b) Go to 

Computer\HKEY_LOCAL_MACHINE\SYSTEM\CurrentControlSet\Control\Print\Monitors
Inside the list of subkeys, there should only be the following subkeys for the default print monitors:
>BJ Language Monitor
>Local Port
>PJL Language Monitor
>Standard TCP/IP Port
>USB Monitor
If there are any subkeys other than the subkeys listed above, Export registry, name it 'Monitorsx86'
- Delete all the subkeys other than listed above.

 c) Exit Registry Editor.
 

If a printer is attached to the computer, disconnect the printer cable from the computer and then restart the computer.

Attach Printer, check whether it works or not, Install printer if not detected.


If problem persists, again do Step 1) & Step 2) then
3) Open Regedit 

 a) Go to

Computer\HKEY_LOCAL_MACHINE\SYSTEM\CurrentControlSet\Control\Print\Printers
-> Export registry, name it 'Printers' 

-> Delete ALL the subkeys

 b) Go to

Computer\HKEY_LOCAL_MACHINE\SYSTEM\CurrentControlSet\Control\Print\Environments\Windows x64\Drivers
-> Export registry, name it 'Drivers' 

-> Delete ALL the subkeys

c) Go to
Computer\HKEY_LOCAL_MACHINE\SYSTEM\CurrentControlSet\Control\Print\Environments\Windows x64\Print Processors
-> Export registry, name it 'PrintProcessors' -> Delete ALL the subkeys
-> Close Registry and Restart Computer.


4) Go to "Turn Windows features on or off" in the control panel
 - Uncheck "Windows Fax and Scan"
 - Reboot


5) Go to "Turn Windows features on or off" in the control panel
 - Recheck "Windows Fax and Scan"
 - Reboot

At this point you should have a stable print spooler.

Add printer now. 
Get the absolute latest printer driver from your manufacturer
(make sure it supports your Operating System Version). 


If you use multiple printer, Add each printer one at a time:

- Add the printer 
- Restart 
- See if it works.
- Add next printer. 


Sunday, March 24, 2013

How to Remove Googleupdate.exe completely

remove googleupdate.exe

Most of us use at least one Google software. Be it Google chrome, Gtalk, Google Earth or other.

Yes they are awesome, but it is annoying  to see ‘googleupdate.exe’ whenever  we check Task Manager.

When all other software gets updated in 5-10 minutes, Why Google needs to update all the time?

If you read security articles frequently, some Android(google supported) Apps reported to Upload privacy data via updates

And if you end it, it will again come and irritate you.


Solution


How to remove googleupdate.exe completely?

 
Well you have to take lot of pain to remove it completely. Follow these steps:
 

1) Block at Firewall

Go to:  Control Panel -> Windows Firewall -> Exception tab
Uncheck ‘googleupdate’  from there if present


2) Block at Task Schedular


Go to: Control Panel -> Schedule Tasks (win xp)
          Control Panel -> System and Security -> Task scheduler (win 7)
 

Find ‘GoogleUpdateTaskUser’ kind of entry -> Delete it 
Scheduled task
Task Schedular

(if it comes again after reboot, then disable it)
 

3) End process in Task Manager

Alt+ctrl+Del -> Task Manager -> ‘Process’ tab -> Right click on ‘googleupdate.exe’ -> End processes

Task manager
Task Manager


4) Stop its service
 

Run -> type ‘Services.msc’ -> Double click ‘googleupdate’ -> select ‘Disabled’ in start up type
 

5) Remove ‘googleupdate.exe’ completely
 

Open ‘Run’ type following paths :
%userprofile%\local settings\application data\google\
c:\Program Files\Google\
 

Open ‘Update’ folder -> delete ‘googleupdate.exe’ from there (can delete everything there)
 

Go back to 'google' folder -> right click ->properties -> Security tab -> edit
In the new ‘Permission and Update’ window
Select a user -> in Permission section, check ‘Deny’ in Full control
Repeat this for each users(must have Administrator rights) -> Apply -> OK

Permisssion


6) Remove from start up
 

Run->msconfig->Startup tab
Uncheck ‘Googleupdate’ from there

msconfig
Msconfig


apply -> ok -> restart


Restart


After restart, Check 'Don't show...' thing in the window that will come after start up and click OK.
 

Done!!

This will surely remove Googleupdate.exe and do all the changes to prevent it from coming.

still after reboot, check these two paths in registry:

(These part is used by Windows to auto run processes on startup)
HKEY_LOCAL_MACHINE\SOFTWARE\Microsoft\Windows\CurrentVersion\Run
HKEY_CURRENT_USER\Software\Microsoft\Windows\CurrentVersion\Run

(Run->Regedit-> go to specified path by expanding each parent 'Entry name')

if you find the Google Update value, simply delete that one, and the process won't be started again on next Windows reboot.


Does this article helped you removing googleupdate.exe ?

Tell us through comments.


Surf freely !!
:) :)

Thursday, February 28, 2013

how to Disable write protection from pendrive

We received problem from our Reader regarding "Removing write protection from Pendrive". Here we will try to solve it.

What is write protection?
SD Card with Lock
- Write Protection is a feature(yes you read it right) that is generally found in flash drives like pen drives and memory card. It prohibits users to write anything to the drive, thus protect the drive from any modification to its data and also stops virus(from computer) to Copy(write) itself to the drive.

Initially, it was done using a small physical (hard)switch located in the Pendrive and memory card. The small yellow switch in this snap is for write protection. Similar, switch is used in any side of some pendrives.

Now, this feature is also being achieved digitally without any Hardware.

Why is it a problem then?
-it is a Problem when:
  a) we don't know about it and it prohibits us from writing
  b) it is (digitally) implemented without user consent either by someone or by Virus

Solution

First of all, make sure if there is any physical Switch is present or not, if it is then adjust it to unlock side.
If there is no physical switch or still problem persists, Go ahead.

As many a times it is done by virus also, it is suggested to scan your system including pendrive with a good updated Antivirus, if you don't have any then Download and install MalwareBytes, update it and do the scan.
For detail information of Virus cleaning, check : clean virus  

UPDATE: 

I have found a simple trick which also solves this problem (when your USB Device has minor problem only). Try this :

1) Right click 'My computer' -> Manage or Management -> Disk management
2) select your USB drive -> Right click ->"change drive letter and paths"
3) Then Rename it to a different letter

Check whether it starts working or not !!

 Note: Quotes( ' ) are used for information only, whenever you are asked to type, do without the quotes. Ex:  if asked to type 'abc'. Then don't put quotations ( ' ) while typing, type only
abc
    
 Method I : Using Diskpart


First we will try to remove read only attribute from the specific drive.

Warning : Be sure to do this on the right disk since the diskpart command can do serious damage if you run it on the wrong disk.

1)  Start Menu -> Run(or in search box) -> Type 'cmd' -> press 'Enter' -> Command Promt will open
2) Type 'Diskpart' -> enter ->  'list disk' -> enter
3) Select the disk you are going to modify, if your required USB disk is in 'disk 4' then 
4) type 'select disk 4' -> enter , now disk 4 is selected,  'list disk' will show star(*) beside it
5) 'list disk' -> enter 
To Clear the Read-Only attribute on the selected disk (To Disable write protection):
6) Type 'attributes disk clear readonly' -> enter
The disk is no longer Write protected. The Read-Only attribute is removed.

If you wish to set the write protection again, just do the same procedure and
Type 'attributes disk set readonly' -> enter

When you are done modifying the disk attributes just issue the exit command
7) Type 'exit' -> enter

If files inside USB drive are still in read only mode
-open command prompt
-Type ' j: ' -> enter (put your drive label in place of 'j' )
- Type ' attrib -r /s /d *.* ' -> enter
- exit


Method II : Using RegEdit


This will Remove write protection from USB Drives. If it doesn't then lets disable writeprotect from your System Using Registry Editor:

1) Start Menu -> Run(or in search box) -> Type 'regedit' -> press 'Enter' -> Registry Editor will open
2) Expand by clicking ' + ' and Navigate to the following path :

HKEY_LOCAL_MACHINE\SYSTEM\CurrentControlSet\Control\StorageDevicePolicies


If you can't find  'StorageDevicePolicies', then you have to create the key:
-Right click on ' control '-> New -> Key -> a new key will get created -> rename it as 'StorageDevicePolicies'
-Right click on 'StorageDevicePolicies' 
-> New -> DWORD (32-bit) Value -> Name it as 'WriteProtect'
writeProtect to storage device policies

Now if you want to enable write protection, use ' 3) ' , to Disable write protection, use ' 4) '

3)To Enable Write protect, Double click on 'WriteProtect', and set its value data to '1'
Edit DWORD value
Once set, all users on the computer is now blocked and prevented from copying, transferring or writing any files, documents and data to the USB disk drives.
4)To Disable Write protect, Double click on 'WriteProtect', and set its value data to '0'
Once reset to '0', all users on the computer is now allowed to copy, transfer or write any file, document and data to the USB disk drives.

5)close your registry edit window.

For first time, you may get that same message again, close the notification window and try to write to the USB again and it should work. You’ll probably have to do this with all your USB drives to clear that “Disk is write protected” message. Hope this helped.

If still same problem then You have to go for Formatting it.

Method III : Using Formatting

Try Formatting by Disk Management
If it doesn't format.

Try these tools:
1) Download Neo 9
(Zipped with Password - techsoln )
2) Transcend's Online Recovery Tool
3)  Apacer Formatting Utility
(Zipped with Password - techsoln )  

Using 1st two is simple.

For using  Apacer Formatting Utility, 
Unzip this utility to preferably on a folder on desktop for easy access (Do Not Save it on pen drive).
Keep your pen drive plugged in
Double click on the 'Start.bat' file in the folder where you unzipped the above utility.
This will start formatting your pen drive, wait till the formatting completes and the LED on your pen drive stops blinking.
Remove your pen drive and plug it in again.


If you still face same problem, go to service center. If you have warranty left then replace your pendrive.

Happy Computing :)

(If you liked it, then click 'g +' below and don't forget to comment)


Monday, February 18, 2013

How to Recover hidden files from Pendrive after virus infection


Mostly pen drive doesn't consist any security measures. Since we use Pen drive in many PC/Laptops it very easily gets infected with viruses and malwares. 

We can easily get rid of these Malwares by scanning it with any good updated Antivirus (no need of Format as it leads to Data loss).

Problem arises when we try to access our data stored in the pen drive.
When we check property of the USB Drive, Disk usage shows there are files in the pen drive but inside pen drive we can't find any!!
Rather we are left with some Shortcuts sometimes.

Don't worry All the files are safe only they are made Hidden by the virus.


To show your hidden files you can follow this link : "Show"


To unhide your files and folders follow these simple steps:

1) Open command prompt:
     (Win 7 & vista) : 
  start->cmd (in search) -> open
It is better to open cmd as administrator:
right click the cmd icon (from search)->-> run as administrator(give admin password if required, else use normal run)

     (Win xp users) :
  start -> run -> type cmd -> Ok


command prompt will open now.

2) Check Drive Letter of you pen drive from 'My Computer'.
Pendrive drive letterFor example, If it is labelled as "e: drive"
     
-> type 'e:' hit enter

now pointer location will go to the drive.
 
3) type this command and hit enter :
     attrib -r -s -h *.* /s /d


attrib command

Hurray, all your files and folders are visible to you now!!
:) :)

Friday, November 23, 2012

How to clean Virus infection from your computer safely

Clean Virus

You came to know that your PC or Laptop is infected with viruses.

Don't Panic! It is not the end of your system, it can be cleaned easily and Formatting is not necessary.

Just Follow our instructions... :)


If your computer is infected with a Malwares (like virus, trojan, worm etc) It is better to remove it as quickly as possible.
You might be thinking of downloading or purchasing an antivirus to remove 'the Parasites'. 

These were the old school methods, But Malware Programmers, or convenient to say, Virus Programmers have gone far ahead.
Now virus connects to their originators and download other malwares and make many changes in your system so as to make it difficult for you to remove them.

Some of those Changes are like :

-> Disable browsing security websites (ex- microsoft.com, symantec.com, etc )
-> Sometimes won't allow to connect to internet.
-> Disable windows tools like Task manager, Registry editor, cmd etc
-> Disable Folder options & thus won't let you see hidden files, extensions
-> Associate itself with system restore points (so that it can revoke itself after system restore)
-> Disable current antivirus program  & even won't allow you to install new antivirus !!
-> In some case, associate itself with the new antivirus being installed and remain untouched by it.

More Tensed!! :o
Don't worry, I am here to solve your problems. :)


Solution

Download some software which will be required further. If you are unable to go to the websites due to virus then download them from a clean computer and keep them in a clean Pen-drive. 

- Virus Process terminating tool : Rkill (download all versions keep them in a folder)
- Virus Removing Tools: Norman malware cleaner or Microsoft Safety Scanner 
- Antivirus: Microsoft security essentials, AVG Free / Avast ,  if you have any other personal choice

Before starting cleaning process,keep above files in infected PC and Disconnect it from Internet. Don't do anything else, Do only the steps asks you to do, in some cases, it can take longer time while scanning, Be Patient!!

First step: Stop Virus process

First it is better to stop processes of virus, so that difficulties in removing virus gets minimised. Please do not Restart your system after using 'Rkill', as Malwares are scheduled to start during start up. Immediately start cleaning as 'Rkill' finishes.  
->Run 'Rkill'
it will show in command prompt all the changes it is making.
When it Finishes, immediately proceed to Second step.

 Second step: Start cleaning 


A fast and safe way to check and clean for viruses is to use 'Virus removal tools' like 'Norman Malware Cleaner' , 'Microsoft Safety Scanner' and other tools provided by antivirus companies for Free(here I am providing those I use most).
These Tools are a free online service that helps you detect and remove viruses.

Procedure: Simple...
-> Run any of the above tools Downloaded
-> Accept
-> Do 'Full scan' and follow the instruction and remove Infected files and Threats
-> If it asks for a restart then Do it.


Third step: Make sure that no virus is left

-> Install MalwareBytes by double clicking it and follow normal steps of installing.

-> Turn off System restore (control panel> system > system restore )
This prevents malwares from coming back.
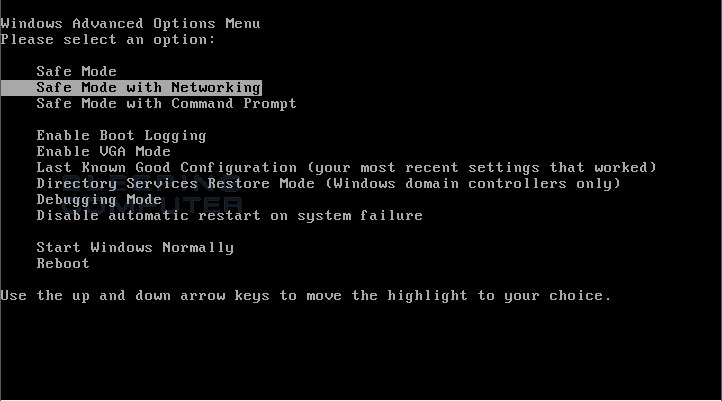
-> Reboot (as screens tuns off,keep tapping F8) with Advance Boot Option , choose 'Safe mode with networking'
Advance Boot Menu -Safe mode with networking

-> connect to internet, (if it doesn't connects, reboot in same fashion & try again. If still can't then reboot normally & connet with internet)
-> Right click the MalwareByte icon  'M' in taskbar, click Check for updates.
-> After finishing Update, Disconnect from internet (better unplug the LAN cable or whichever medium being used)
-> Open MalwareBytes, Do a 'Full scan'
-> Follow removal process as asked(check all detected->Remove selected)
-> Reboot Normally, again check for updates, again Do 'Full Scan' (to be double sure)
-> if it catches virus again, then clean them follow process mentioned in above line again

Now you can be sure of removal of viruses.
But still to be on safer side, Follow Step 3.

Fourth Step: Prohibiting attack

Now your system is cleaned from infection. But it needs Proactive monitoring so as to catch and prevent any future Virus attack. You may connect to internet now.

- Install a good Antivirus with Proactive Monitoring

Choosing Antivirus: I have chosen these two as per my experience and criteria, we can discuss it in further posts.
If your systems run Genuine Microsoft Windows version, then you must choose 'Microsoft security essentials' as it is the only Free complete version and very much effective Antivirus Program available. 
Else you may opt for  Free AVG/ Avast or any Good Antivirus (we will discuss about them in further posts)

- After installation, Update it
- Do a Full scan (to be on safer side)
- Remove infection as per instruction (if any)
- Restart if it asks to


This is Basic suggestion that can be given to any Infected Computer remotely for safely removal of Malwares (viruses in common language) .

It is Suggested to Learn and Practice Virus-safety Habits to prevent further virus attack. 


Feel free to ask any problem, i'll be happy trying to solve them.

Happy Computing and safe surfing :)

Tuesday, August 14, 2012

How to completely clear url history on firefox

Recently I came across a  question regarding how to Clear Completely the suggestion provided by browser which generally comes from our Browser History.

Truth is, Suggestions comes from two sources:
  1. Browsing History
  2. Bookmark Favourites
How to get rid of them?

Solution 1: Private Browsing


Private Browsing allows you to browse the Internet without saving any information about which sites and pages you’ve visited.
How to use it:

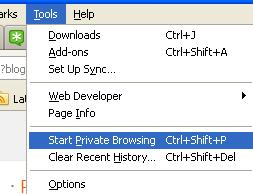
Tools -> Start Private Browsing


Click on Start private browsing button when asked 
(you may/ may not check the check box there)


Solution 2: Browsing History


 Tools -> Options

In History section

Choose Never remember history


In Location bar section:

choose Nothing


   With above, also check your Bookmarks/ Favorite/ Starred links. Remove unwanted address from there.

Happy Browsing.. :)

How to fix Registry editing has been disabled by Your administrator


You try to run regedit form start menu you are getting an error like this 'Registry editing has been disabled by administrator'


 Regedit is widely used to successfully remove Virus and their effects. This is also the reason why virus makers love to disable the Registry Editor so it makes solving the problem and removing the issue difficult.

Viruses are not always the reason for this issue sometimes administrators in IT departments place a restrictions on using the regedit command to keep employees from changes things on company computers.

 Let us look at the solution to fix it:

 Solution 1: Using the Group Policy Editor

  • Start -> Run -> gpedit.msc and press ENTER
  • Expand the '+' sign to go to the following location: User Configuration ->Administrative Templates -> System
  • Double-click 'Prevent access to registry editing tools' and set it to Not Configured
  • Exit the Group Policy Editor
    Note: 
    If the setting already reads Not Configured, set it to Enabled, and click Apply. Then revert it back to Not Configured. This ensures that the DisableRegistryTools registry value is removed successfully.


Solution 2: Using the REG.EXE console tool  

Start -> Run -> type this command:

REG add HKCU\Software\Microsoft\Windows\CurrentVersion\Policies\System /v DisableRegistryTools /t REG_DWORD /d 0 /f

Solution 3:
Symantec has developed a tool UnHookexec.inf which makes access to registry editing easy and sets their registry values to their default values. It is an inf file right click the tool and install . 

Solution 4:

Download this VB script file from doug Knox Website and run it .If you get any warning click ok to continue. After VB Script file enables registry editor ,restart your computer and access registry.


Solution 5:

Some viruses and other malware will load a regedit.com file that is many times a zero byte dummy file. Because .com files have preference over .exe files when executed if you type REGEDIT in the run line, it will run the regedit.com instead of the real regedit.exe file.

Delete the regedit.com file if its a zero byte file to restore access to REGEDIT. In some cases, such as the W32.Navidad worm, you'll need to rename the REGEDIT file to get it to work.

 Happy Troubleshooting ...

:)