
Friday, March 15, 2013

Play Incomplete Downloaded Videos in IDM


Many a times, while downloading video from IDM, some of video remains incomplete and don't allow to resume.
If it stops at 99% or 98% it is very irritating for us. We again download it from very beginning, which is time consuming and also entire data is again downloaded.

IDM home screen
If you have also faced above problem, then this blog will bring smile to your face.
Because you can search those incomplete files in your system and even play them(if they more than 90% downloaded).

Let us see how!!


Run

Step I : Open Appdata

->Click 'Start'
(win XP user) -> click 'Run'
(Win 7 user) in search box -> type 'Run' -> open
->Type ' %appdata% '


Step II : Browse Folder where file is

   
Go to 'IDM' -> 'DwnlData' -> User ->
Now, you have to apply your brain.

Here each folder is for each downloaded files(generally) whether complete(less in size) or incomplete(large in size).

Look for the folder which is large in size, Open it.
Here is screenshot of one such folder, the 'User name' is blackened for anonymity.

A Folder where in incomplete files are saved

 Since, IDM breaks files into multiple files, so it shows multiple files.
If it is single file(some website doesn't allow multiple download) then here you will find one larger file.

Step III : check and Play the files  


Leave the Log file, Drag and drop each large files in multi-format supported Player like- 'VLC player' or 'Media Player Classic'.


Hurray!! Now your incomplete downloads are accessible to you!!


Don't forget to Leave your comments and experiences, I'll be answering if any query is there.


Enjoy!!

Wednesday, March 13, 2013

Track stolen phone - Best Anti Theft Free Android App - TheftSpy

Screenshot
Smartphone is our best friend and worst enemy.
We store personal Documents, Pictures, videos, Bank details and many more things in it.

What if it gets stolen?

our phone will expose all our contacts, bank credentials, location, personal SMS/Pictures and so much more.
So we must prevent or minimize the risk of such things happening.

We have found out an App for Android Phone users which Registers your device rather than registering the SIM(any thief will first throw away the SIM). It is SS TheftSpy, which is strong enough App to help you in any such situations.

What should you do?
-first register an account on TheftSpy website and then install its android app on your android device. 

What is the System requirement?
-Requires Android 2.3 and higher. WiFi, Edge, or 3G network connection sometimes required.

 Features:
-can be used to control your device remotely and gather all information which is inside your stolen device.
-TheftSpy usually runs in background and is invisible in app drawer.
-user can remotely reset the device, switch off it, reboot it.
-collect pictures, videos, call logs, and other documents.
-Take Picture using Rear and front camera when Key-guard lock unlock attempt
-User can remotely get current GPS location of the device.
-Enable or disable key-lock
-can get screenshot also

-can record audio for 30 seconds remotely.
-Data Security such as wipe all data, gallery and Whatsapp content.


The fully loaded Android-App offers a bunch of Features which are 100% free and useable for everyone.

There are no restrictions or less features in the "Free-User"-Mode.

TheftSpy offers 3 days of Premium to try all functionality.

Special feature for paid users: The user after becoming premium user will get a chance of uploading 5GB data in TheftSpy account.


You cannot do much to get your stolen mobile back if the thief is a geek or Good techie. But its less likely that the thief is a very good techie. The best thing you can do is to install TheftSpy to your device so that at time you can remotely manage your device data remotely and minimize the effects and impact of theft.  So why to waste time thinking, start downloading TheftSpy and protect your mobile.

Links:
TheftSpy website

Play-store link

Thursday, February 28, 2013

how to Disable write protection from pendrive

We received problem from our Reader regarding "Removing write protection from Pendrive". Here we will try to solve it.

What is write protection?
SD Card with Lock
- Write Protection is a feature(yes you read it right) that is generally found in flash drives like pen drives and memory card. It prohibits users to write anything to the drive, thus protect the drive from any modification to its data and also stops virus(from computer) to Copy(write) itself to the drive.

Initially, it was done using a small physical (hard)switch located in the Pendrive and memory card. The small yellow switch in this snap is for write protection. Similar, switch is used in any side of some pendrives.

Now, this feature is also being achieved digitally without any Hardware.

Why is it a problem then?
-it is a Problem when:
  a) we don't know about it and it prohibits us from writing
  b) it is (digitally) implemented without user consent either by someone or by Virus

Solution

First of all, make sure if there is any physical Switch is present or not, if it is then adjust it to unlock side.
If there is no physical switch or still problem persists, Go ahead.

As many a times it is done by virus also, it is suggested to scan your system including pendrive with a good updated Antivirus, if you don't have any then Download and install MalwareBytes, update it and do the scan.
For detail information of Virus cleaning, check : clean virus  

UPDATE

I have found a simple trick which also solves this problem (when your USB Device has minor problem only). Try this :

1) Right click 'My computer' -> Manage or Management -> Disk management
2) select your USB drive -> Right click ->"change drive letter and paths"
3) Then Rename it to a different letter

Check whether it starts working or not !!

 Note: Quotes( ' ) are used for information only, whenever you are asked to type, do without the quotes. Ex:  if asked to type 'abc'. Then don't put quotations ( ' ) while typing, type only
abc
    
 Method I : Using Diskpart


First we will try to remove read only attribute from the specific drive.

Warning : Be sure to do this on the right disk since the diskpart command can do serious damage if you run it on the wrong disk.

1)  Start Menu -> Run(or in search box) -> Type 'cmd' -> press 'Enter' -> Command Promt will open
2) Type 'Diskpart' -> enter ->  'list disk' -> enter
3) Select the disk you are going to modify, if your required USB disk is in 'disk 4' then 
4) type 'select disk 4' -> enter , now disk 4 is selected,  'list disk' will show star(*) beside it
5) 'list disk' -> enter 
To Clear the Read-Only attribute on the selected disk (To Disable write protection):
6) Type 'attributes disk clear readonly' -> enter
The disk is no longer Write protected. The Read-Only attribute is removed.

If you wish to set the write protection again, just do the same procedure and
Type 'attributes disk set readonly' -> enter

When you are done modifying the disk attributes just issue the exit command
7) Type 'exit' -> enter

If files inside USB drive are still in read only mode
-open command prompt
-Type ' j: ' -> enter (put your drive label in place of 'j' )
- Type ' attrib -r /s /d *.* ' -> enter
- exit


Method II : Using RegEdit


This will Remove write protection from USB Drives. If it doesn't then lets disable writeprotect from your System Using Registry Editor:

1) Start Menu -> Run(or in search box) -> Type 'regedit' -> press 'Enter' -> Registry Editor will open
2) Expand by clicking ' + ' and Navigate to the following path :

HKEY_LOCAL_MACHINE\SYSTEM\CurrentControlSet\Control\StorageDevicePolicies


If you can't find  'StorageDevicePolicies', then you have to create the key:
-Right click on ' control '-> New -> Key -> a new key will get created -> rename it as 'StorageDevicePolicies'
-Right click on 'StorageDevicePolicies
-> New -> DWORD (32-bit) Value -> Name it as 'WriteProtect'
writeProtect to storage device policies

Now if you want to enable write protection, use ' 3) ' , to Disable write protection, use ' 4) '

3)To Enable Write protect, Double click on 'WriteProtect', and set its value data to '1'
Edit DWORD value
Once set, all users on the computer is now blocked and prevented from copying, transferring or writing any files, documents and data to the USB disk drives.
4)To Disable Write protect, Double click on 'WriteProtect', and set its value data to '0'
Once reset to '0', all users on the computer is now allowed to copy, transfer or write any file, document and data to the USB disk drives.

5)close your registry edit window.

For first time, you may get that same message again, close the notification window and try to write to the USB again and it should work. You’ll probably have to do this with all your USB drives to clear that “Disk is write protected” message. Hope this helped.

If still same problem then You have to go for Formatting it.

Method III : Using Formatting

Try Formatting by Disk Management
If it doesn't format.

Try these tools:
1) Download Neo 9
(Zipped with Password - techsoln )
2) Transcend's Online Recovery Tool
3)  Apacer Formatting Utility
(Zipped with Password - techsoln )  

Using 1st two is simple.

For using  Apacer Formatting Utility, 
Unzip this utility to preferably on a folder on desktop for easy access (Do Not Save it on pen drive).
Keep your pen drive plugged in
Double click on the 'Start.bat' file in the folder where you unzipped the above utility.
This will start formatting your pen drive, wait till the formatting completes and the LED on your pen drive stops blinking.
Remove your pen drive and plug it in again.


If you still face same problem, go to service center. If you have warranty left then replace your pendrive.

Happy Computing :)

(If you liked it, then click 'g +' below and don't forget to comment)


Friday, February 22, 2013

Speed Up Your Internet Connection by Changing Your DNS Server

DNS
Who doesn't want a better internet speed?
Who will not be happy after getting a better and quicker response from web browser after requesting any url(say, www.tech-soln.blogspot.com )

Here I just try to help you by making your web browsing experience better. Obviously by helping you enhance your internet connectivity options. That is by choosing the best and fastest DNS for your connection.

What is DNS servers? How will it affect internet speed?

The DNS protocol is an important part of the web's infrastructure, serving as the Internet's phone book: every time you visit a website, your computer performs a DNS lookup. Complex pages often require multiple DNS lookups before they start loading, so your computer may be performing hundreds of lookups a day.
In one line, "url to IP address translation" is done at DNS server.

In make it simpler, Lets look how a webpage loads in your system using internet.

whenever you request any url(say, www.tech-soln.blogspot.com ) your web browser goes to DNS server for its corresponding IP address(here, "173.194.36.43" ). After the url is resolved to its corresponding IP address, then only your request go to desired website server and in return its respective page is sent to your IP address.
so faster the DNS server, faster the web page loading.

How to Find Fast DNS servers?
There are many Fast Open DNs servers available, also DNs Provided by ISP also works good. Choosing Best and Fastest DNS for your connection is complex as it is decided by many factors( location, type of connection, ISP used, etc).

Best way to select best DNS server for your connection is to test yourself using good benchmark tools in your own internet speed. I'll recommend :
1) DNS Benchmark
2) Namebench

How to use?
1) DNS Benchmark (Zipped with Password - techsoln )
Download it -> double-click executable file -> click 'Nameservers tab'-> Add/Remove button.
The Edit DNS Server IPs window will open. At the very bottom, click the "Build Nameserver Custom List" option.
In the resulting pop-up box, click the Build Custom List button
wait for the process to complete, it usually takes about 37 minutes.
When the list is complete, click the "Run Benchmark button" on the Nameservers tab. When the benchmark completes its work, it will present the results automatically, sorted by response time.

2) Namebench
download it->double-click the executable file -> check both 'include global DNS providers' and 'Include best available regional DNS services' options.
confirm that your location is set properly in the corresponding drop-down menu.
click the 'Start Benchmark' button.
Namebench will run a few tests and then present you with a results page listing the fastest DNS name servers that your system can access.

You can verify its effect by using http://www.speedtest.net before and after changing the DNS server.

If you don't want to do above tests, select by hit and try the following DNS servers.
there are many Free Public DNS servers available, some Faster(in general) are shown here:
8.8.8.8             & 8.8.4.4             (Google Public DNS-Sufer fast)
67.138.54.120   & 207.225.209.77 (ScrubIT3)
69.164.208.50   & 216.87.84.211   (OpenNIC4)
199.5.157.131   & 208.71.35.137   (Public-Root5)
8.26.56.26        & 8.20.247.20      (Comodo DNS)
208.67.222.222 & 208.67.220.220  (OpenDNS)
156.154.70.1     & 156.154.71.1     (DNS Advantage)
198.153.192.1   & 198.153.194.1    (Norton DNS)
208.76.50.50     & 208.76.51.51     (SmartViper)
209.244.0.3      & 209.244.0.4       (Level3)


How to change DNS?

Go to Control Panel->Network and Sharing Center->Click 'Local Area Connection'-> Properties -> Select 'Internet Protocol Version 4 (TCP/IPv4)'->click 'Properties'-> click on 'Use the following DNS addresses' and change it to the best one you find.then ok -ok to come out.


Happy speedy Surfing :)

Monday, February 18, 2013

How to Recover hidden files from Pendrive after virus infection


Mostly pen drive doesn't consist any security measures. Since we use Pen drive in many PC/Laptops it very easily gets infected with viruses and malwares. 

We can easily get rid of these Malwares by scanning it with any good updated Antivirus (no need of Format as it leads to Data loss).

Problem arises when we try to access our data stored in the pen drive.
When we check property of the USB Drive, Disk usage shows there are files in the pen drive but inside pen drive we can't find any!!
Rather we are left with some Shortcuts sometimes.

Don't worry All the files are safe only they are made Hidden by the virus.


To show your hidden files you can follow this link : "Show"


To unhide your files and folders follow these simple steps:

1) Open command prompt:
     (Win 7 & vista) : 
  start->cmd (in search) -> open
It is better to open cmd as administrator:
right click the cmd icon (from search)->-> run as administrator(give admin password if required, else use normal run)

     (Win xp users) :
  start -> run -> type cmd -> Ok


command prompt will open now.

2) Check Drive Letter of you pen drive from 'My Computer'.
Pendrive drive letterFor example, If it is labelled as "e: drive"
     
-> type 'e:' hit enter

now pointer location will go to the drive.
 
3) type this command and hit enter :
     attrib -r -s -h *.* /s /d


attrib command

Hurray, all your files and folders are visible to you now!!
:) :)

Tuesday, November 27, 2012

How to increase your Internet speed by 20%

Let me ask one question to you

Do you know, Most of the people Don't use their internet speed to their full potential?

Yes, You read it right.. Most of you don't use their maximum internet speed.

Internet speed depends on two factors:
1. External Factors
2. Internal Factors

External Factors can be taken care by checking your internet speed by any speed testing websites and matching that with the speed, your service provider has promised you to provide.

By 'Internal Factor' I mean, whether you use 100% of the speed being recieved on port/wifi device of your computer or not ?

Truth is, most of us use only 80% of the internet speed being received. Rest 20% is reserved by
default for windows.

 Solution


To Utilize 100% of your internet speed, follow these simple procedure:
 
-> Go to "Start->Run"
-> type "gpedit.msc" enter
-> Go to "computer configuration->administrative templates->network->Qos packet scheduler"
-> double click on "Limit reservable bandwidth" 
-> in the window select enable and set it to '0'
-> 'apply->ok'

close the window and enjoy :)

you can revert it anytime you wish to by "selecting not configured"


Happy speedy surfing :)


Friday, November 23, 2012

How to clean Virus infection from your computer safely

Clean Virus

You came to know that your PC or Laptop is infected with viruses.

Don't Panic! It is not the end of your system, it can be cleaned easily and Formatting is not necessary.

Just Follow our instructions... :)


If your computer is infected with a Malwares (like virus, trojan, worm etc) It is better to remove it as quickly as possible.
You might be thinking of downloading or purchasing an antivirus to remove 'the Parasites'. 

These were the old school methods, But Malware Programmers, or convenient to say, Virus Programmers have gone far ahead.
Now virus connects to their originators and download other malwares and make many changes in your system so as to make it difficult for you to remove them.

Some of those Changes are like :

-> Disable browsing security websites (ex- microsoft.com, symantec.com, etc )
-> Sometimes won't allow to connect to internet.
-> Disable windows tools like Task manager, Registry editor, cmd etc
-> Disable Folder options & thus won't let you see hidden files, extensions
-> Associate itself with system restore points (so that it can revoke itself after system restore)
-> Disable current antivirus program  & even won't allow you to install new antivirus !!
-> In some case, associate itself with the new antivirus being installed and remain untouched by it.

More Tensed!! :o
Don't worry, I am here to solve your problems. :)


Solution

Download some software which will be required further. If you are unable to go to the websites due to virus then download them from a clean computer and keep them in a clean Pen-drive. 

- Virus Process terminating tool : Rkill (download all versions keep them in a folder)
- Virus Removing Tools: Norman malware cleaner or Microsoft Safety Scanner 
- Antivirus: Microsoft security essentials, AVG Free / Avast ,  if you have any other personal choice

Before starting cleaning process,keep above files in infected PC and Disconnect it from Internet. Don't do anything else, Do only the steps asks you to do, in some cases, it can take longer time while scanning, Be Patient!!

First step: Stop Virus process

First it is better to stop processes of virus, so that difficulties in removing virus gets minimised. Please do not Restart your system after using 'Rkill', as Malwares are scheduled to start during start up. Immediately start cleaning as 'Rkill' finishes.  
->Run 'Rkill'
it will show in command prompt all the changes it is making.
When it Finishes, immediately proceed to Second step.

 Second step: Start cleaning 


A fast and safe way to check and clean for viruses is to use 'Virus removal tools' like 'Norman Malware Cleaner' , 'Microsoft Safety Scanner' and other tools provided by antivirus companies for Free(here I am providing those I use most).
These Tools are a free online service that helps you detect and remove viruses.

Procedure: Simple...
-> Run any of the above tools Downloaded
-> Accept
-> Do 'Full scan' and follow the instruction and remove Infected files and Threats
-> If it asks for a restart then Do it.


Third step: Make sure that no virus is left

-> Install MalwareBytes by double clicking it and follow normal steps of installing.

-> Turn off System restore (control panel> system > system restore )
This prevents malwares from coming back.
-> Reboot (as screens tuns off,keep tapping F8) with Advance Boot Option , choose 'Safe mode with networking'
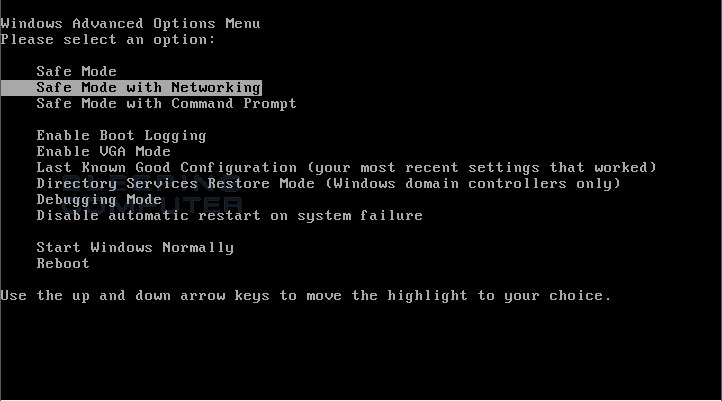
Advance Boot Menu -Safe mode with networking

-> connect to internet, (if it doesn't connects, reboot in same fashion & try again. If still can't then reboot normally & connet with internet)
-> Right click the MalwareByte icon  'M' in taskbar, click Check for updates.
-> After finishing Update, Disconnect from internet (better unplug the LAN cable or whichever medium being used)
-> Open MalwareBytes, Do a 'Full scan'
-> Follow removal process as asked(check all detected->Remove selected)
-> Reboot Normally, again check for updates, again Do 'Full Scan' (to be double sure)
-> if it catches virus again, then clean them follow process mentioned in above line again

Now you can be sure of removal of viruses.
But still to be on safer side, Follow Step 3.

Fourth Step: Prohibiting attack

Now your system is cleaned from infection. But it needs Proactive monitoring so as to catch and prevent any future Virus attack. You may connect to internet now.

- Install a good Antivirus with Proactive Monitoring

Choosing Antivirus: I have chosen these two as per my experience and criteria, we can discuss it in further posts.
If your systems run Genuine Microsoft Windows version, then you must choose 'Microsoft security essentials' as it is the only Free complete version and very much effective Antivirus Program available. 
Else you may opt for  Free AVG/ Avast or any Good Antivirus (we will discuss about them in further posts)

- After installation, Update it
- Do a Full scan (to be on safer side)
- Remove infection as per instruction (if any)
- Restart if it asks to


This is Basic suggestion that can be given to any Infected Computer remotely for safely removal of Malwares (viruses in common language) .

It is Suggested to Learn and Practice Virus-safety Habits to prevent further virus attack. 


Feel free to ask any problem, i'll be happy trying to solve them.

Happy Computing and safe surfing :)